Browse Month: February 2017

What is Cloud Computing?

This post we are going to learn about Cloud Computing.

Cloud Computing is a network of remote servers hosted on the Internet based computing to store, retrieve, manage, and process data, instead of a local server or a personal computer and other services are in demand.

Basically, the Cloud Services is run by a reliable company like IBM, Google, Amazon, Microsoft, Oracle etc.

Various types of cloud services are available, see below.

  • SaaS – Software as a Service, Example: Google+
  • PaaS – Platform as a Service, Example: Microsoft Azure
  • IaaS – Infrastructure as a Service, Example: Google Compute Engine
  • DaaS – Database as a Service, Example: Amazon Relational Database Service
  • HaaS – Hardware as a Service, Example: Amazon EC2
  • MBaaS – Mobile Backend as a Service, Example: Firebase
  • FaaS  – Functions as a Service, Example: AWS Lambda

Advantages:

  • Cost savings.
  • Scalable and high performance.
  • Easy to manage the data, functions or files.
  • Easy to build and set up a cloud computing service in minutes.
  • Access the data anywhere and anytime using any platform.
  • Pay based on usage.
  • Easy to maintain and operate, less down time in case one machine/server is down, instantly another machine/server will be started another region or data center.
  • Flexibility to use any operating system, programming languages, and database.

Disadvantages:

  • The network is down or any technical issues, you can’t access the cloud services or system (you may not have much visibility).
  • External services always have a security risk.
  • Limited access to control and manage the functions and cloud service provider have more control.

How to Install and setup Maven in Eclipse?

This post we are going to learn about Install and setup Maven in Eclipse.

Step: 1 – Open Eclipse IDE

Step: 2 – Install Maven Eclipse plugin

Go to Help >> Click Install New Software…

Step: 3 – Maven Eclipse plugin http://download.eclipse.org/technology/m2e/releases

Select Maven Integration for Eclipse

Step: 4 – Click Next button

Step: 4 – Click Next button

Step: 6 – Select license agreement, then click the Finish button

Step: 7 – Click Yes button Eclipse IDE will get restarted.

Once restarted the Eclipse, Maven installation will take effect.

How to Install and Setup Java and Maven on Windows?

This post we are going to learn about How to Install and Setup Java and Maven on Windows.

Using Java version 1.8.0 with Windows 10, please make sure Java should be installed before Maven setup.

Step: 1

Download Java – http://www.oracle.com/technetwork/java/javase/downloads/index-jsp-138363.html

Step: 2

Install Java

Java 8 exe is installed in below path.

C:\Program Files\Java\jdk1.8.0_112

Step: 3

Java Home Setup

Right click This PC, and select Properties from the menu.

Right click Advanced system settings.

Then click Environment Variables

System variables >> Click New

Add below entries

Variable name: JAVA_HOME

Variable value: C:\Program Files\Java\jdk1.8.0_112

Click OK

JAVA_HOME is added to System variables.

Maven:

Maven build automation tool used mainly for Java and J2EE projects.

 Step 4:

Download Maven: https://maven.apache.org/download.cgi

 Step 5:

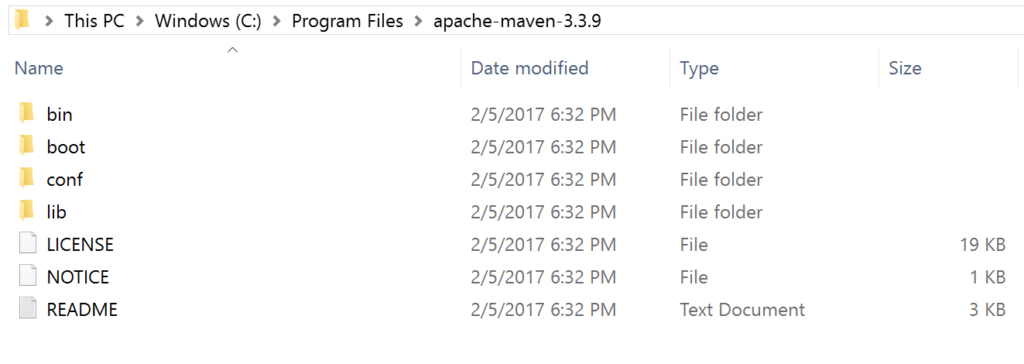
Download the apache-maven-3.3.9-bin.zip file and unzip to C:\Program Files\apache-maven-3.3.9

Step 6:

M2 Setup >> Go to System Properties >> Advanced >> Click Environment Variables

Step: 7

System variables >> Click New

Add below entries

Variable name: M2_HOME

Variable value: C:\Program Files\Apache\maven

Click OK

Step: 8

System variables >> Click New

Add below entries

Variable name: MAVEN_HOME

Variable value: C:\Program Files\Apache\maven

Click OK

M2_HOME and MAVEN_HOME are getting added to System variables.

Step: 9

M2 Setup Adding to Path, select Path in System Variable Click Edit button.

Step: 10

Click New button adds below entry.

%M2_HOME%\bin

Click OK button.

Step: 11

Open command prompt

Check installed Java version

C:\Users\rrmah>java -version
java version “1.8.0_112”
Java(TM) SE Runtime Environment (build 1.8.0_112-b15)
Java HotSpot(TM) 64-Bit Server VM (build 25.112-b15, mixed mode)

Step: 12

Check installed Maven version

C:\Users\rrmah>mvn -version
Apache Maven 3.3.9 (bb52d8502b132ec0a5a3f4c09453c07478323dc5; 2015-11-10T11:41:47-05:00)
Maven home: C:\Program Files\Apache\maven
Java version: 1.8.0_112, vendor: Oracle Corporation
Java home: C:\Program Files\Java\jdk1.8.0_112\jre
Default locale: en_US, platform encoding: Cp1252
OS name: “windows 10”, version: “10.0”, arch: “amd64”, family: “dos”