How to Create Maven project using Eclipse?

The simple tutorial will show, how to create a simple Maven project using Eclipse IDE.

Tools, I have used.

  1. Eclipse Java EE
  2. Apache Maven and
  3. Java

Make sure, and all the above tools are installed and configured correctly.

Step: 1

File > Maven Project

Click ‘Next’ button.

Step: 2

Click ‘Next’ button.

Step: 3

Click ‘Finish’ button.

 Step: 4

Maven project is created.

Step: 5

pom file > Run As > Maven build


Results:

[INFO] Scanning for projects…

[INFO]

[INFO] ————————————————————————

[INFO] Building MavenTest 0.0.1-SNAPSHOT

[INFO] ————————————————————————

[INFO]

[INFO] — maven-clean-plugin:2.5:clean (default-clean) @ MavenTest —

[INFO] Deleting C:\WorkspaceMaven\MavenTest\target

[INFO] ————————————————————————

[INFO] BUILD SUCCESS

[INFO] ————————————————————————

[INFO] Total time: 0.720 s

[INFO] Finished at: 2017-04-22T14:03:45-04:00

[INFO] Final Memory: 6M/149M

[INFO] ————————————————————————

[WARNING] The requested profile “install” could not be activated because it does not exist.

What is Cloud Computing?

This post we are going to learn about Cloud Computing.

Cloud Computing is a network of remote servers hosted on the Internet based computing to store, retrieve, manage, and process data, instead of a local server or a personal computer and other services are in demand.

Basically, the Cloud Services is run by a reliable company like IBM, Google, Amazon, Microsoft, Oracle etc.

Various types of cloud services are available, see below.

  • SaaS – Software as a Service, Example: Google+
  • PaaS – Platform as a Service, Example: Microsoft Azure
  • IaaS – Infrastructure as a Service, Example: Google Compute Engine
  • DaaS – Database as a Service, Example: Amazon Relational Database Service
  • HaaS – Hardware as a Service, Example: Amazon EC2
  • MBaaS – Mobile Backend as a Service, Example: Firebase
  • FaaS  – Functions as a Service, Example: AWS Lambda

Advantages:

  • Cost savings.
  • Scalable and high performance.
  • Easy to manage the data, functions or files.
  • Easy to build and set up a cloud computing service in minutes.
  • Access the data anywhere and anytime using any platform.
  • Pay based on usage.
  • Easy to maintain and operate, less down time in case one machine/server is down, instantly another machine/server will be started another region or data center.
  • Flexibility to use any operating system, programming languages, and database.

Disadvantages:

  • The network is down or any technical issues, you can’t access the cloud services or system (you may not have much visibility).
  • External services always have a security risk.
  • Limited access to control and manage the functions and cloud service provider have more control.

How to Install and setup Maven in Eclipse?

This post we are going to learn about Install and setup Maven in Eclipse.

Step: 1 – Open Eclipse IDE

Step: 2 – Install Maven Eclipse plugin

Go to Help >> Click Install New Software…

Step: 3 – Maven Eclipse plugin http://download.eclipse.org/technology/m2e/releases

Select Maven Integration for Eclipse

Step: 4 – Click Next button

Step: 4 – Click Next button

Step: 6 – Select license agreement, then click the Finish button

Step: 7 – Click Yes button Eclipse IDE will get restarted.

Once restarted the Eclipse, Maven installation will take effect.

How to Install and Setup Java and Maven on Windows?

This post we are going to learn about How to Install and Setup Java and Maven on Windows.

Using Java version 1.8.0 with Windows 10, please make sure Java should be installed before Maven setup.

Step: 1

Download Java – http://www.oracle.com/technetwork/java/javase/downloads/index-jsp-138363.html

Step: 2

Install Java

Java 8 exe is installed in below path.

C:\Program Files\Java\jdk1.8.0_112

Step: 3

Java Home Setup

Right click This PC, and select Properties from the menu.

Right click Advanced system settings.

Then click Environment Variables

System variables >> Click New

Add below entries

Variable name: JAVA_HOME

Variable value: C:\Program Files\Java\jdk1.8.0_112

Click OK

JAVA_HOME is added to System variables.

Maven:

Maven build automation tool used mainly for Java and J2EE projects.

 Step 4:

Download Maven: https://maven.apache.org/download.cgi

 Step 5:

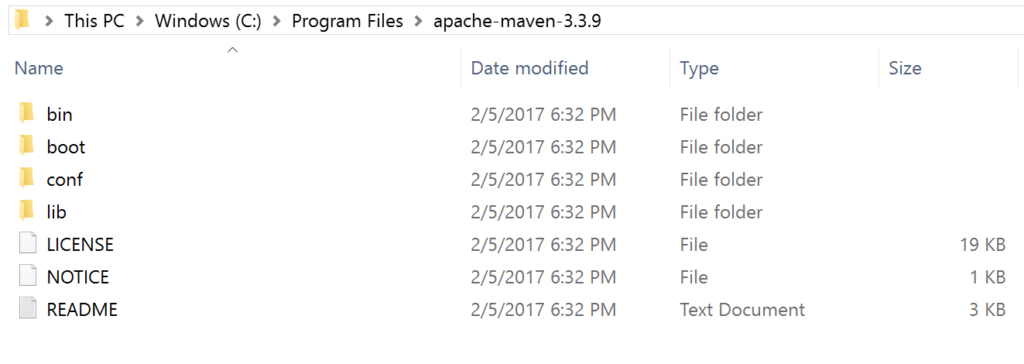
Download the apache-maven-3.3.9-bin.zip file and unzip to C:\Program Files\apache-maven-3.3.9
Step 6:

M2 Setup >> Go to System Properties >> Advanced >> Click Environment Variables

Step: 7

System variables >> Click New

Add below entries

Variable name: M2_HOME

Variable value: C:\Program Files\Apache\maven

Click OK

Step: 8

System variables >> Click New

Add below entries

Variable name: MAVEN_HOME

Variable value: C:\Program Files\Apache\maven

Click OK

M2_HOME and MAVEN_HOME are getting added to System variables.

Step: 9

M2 Setup Adding to Path, select Path in System Variable Click Edit button.

Step: 10

Click New button adds below entry.

%M2_HOME%\bin

Click OK button.

Step: 11

Open command prompt

Check installed Java version

C:\Users\rrmah>java -version
java version “1.8.0_112”
Java(TM) SE Runtime Environment (build 1.8.0_112-b15)
Java HotSpot(TM) 64-Bit Server VM (build 25.112-b15, mixed mode)

Step: 12

Check installed Maven version

C:\Users\rrmah>mvn -version
Apache Maven 3.3.9 (bb52d8502b132ec0a5a3f4c09453c07478323dc5; 2015-11-10T11:41:47-05:00)
Maven home: C:\Program Files\Apache\maven
Java version: 1.8.0_112, vendor: Oracle Corporation
Java home: C:\Program Files\Java\jdk1.8.0_112\jre
Default locale: en_US, platform encoding: Cp1252
OS name: “windows 10”, version: “10.0”, arch: “amd64”, family: “dos”

What is web service and what are the different types of web services?

This tutorial we are going to learn web service and what are the different types of web services.

Web Service:

Web Services is a technology communicate between two electronic devices over the internet or intranet using the collection of standard protocols for world wide web (WWW), service data typically exchange XML or JSON format.

A standard Web Service using below components:

  • XML (eXtensible Markup Language)
  • SOAP (Simple Object Access Protocol)
  • UDDI (Universal Description, Discovery, and Integration)
  • WSDL (Web Services Description Language)

XML stands for eXtensible Markup Language. A uniform data representation and exchange mechanism that defines a set of rules for encoding documents in a format that is both human and machine readable.

SOAP stands for Simple Object Access Protocol. SOAP is a HTTP based protocol specification for exchanging structured information in XML form, interact across any computer networks, specifically HTTP (Hypertext Transfer Protocol).

UDDI stands for Universal Description, Discovery, and Integration. UDDI is a platform independent, UDDI is an XML based network protocol, where web service registers their web services and the client can search, find and invoke web services. SOAP is the most popular protocol for communication.

WSDL stands for Web Services Description Language, WSDL is written in XML format and it is used a standard metalanguage to describe the web services offered, WSDL is a program/language that describes the provider services as a set of endpoints messages containing either document-oriented or procedure-oriented information. The same web service can have multiple endpoints using different protocols and what communications protocol is used to talk to that service.

Web Services Types:

  1. SOAP (Simple Object Access Protocol)
  2. REST (Representational State Transfer)

SOAP stands for Simple Object Access Protocol. SOAP is an HTTP based protocol specification for exchanging structured information in XML form, interact across any computer networks, specifically HTTP (Hypertext Transfer Protocol).

REST stands for Representational State Transfer. REST is architectural principles for building web service using HTTP protocol using basic HTTP methods like POST, GET, PUT and DELETE (CRUD – Create, Read, Update, and Delete).

REST web service supports formats like JSON, XML, HTML and Text

  • REST uses standard methods like

What are differences between SOAP web services and REST web services?

SOAP and REST web service cannot be compared directly, see below differences.

S.No SOAP REST
1 SOAP stands for Simple Object Access Protocol. REST stands for Representational State Transfer.
2 SOAP is a protocol REST is an architectural style
3 SOAP can use almost any transport request REST uses HTTP and HTTPS
4 SOAP supports state full calls REST is totally stateless operations
5 SOAP is a more strict contract in the form of WSDL REST does not have any strict contract
SOAP defines own security REST will inherit the transport level security over HTTP.
6 SOAP response cannot be cached REST response can be cached
7 SOAP format will be restricted to XML REST will support formats like XML, JSON, HTML, Text
8 Java API for SOAP Web Services, JAX-WS Java API for REST Web Services, JAX-RS
9 SOAP requires an XML wrapper for all the request and response REST is lighter, this reason REST is prepared for mobile devices
10 SOAP bit slower and less prepared REST is faster compared to SOAP, more prepared, simple to use and lightweight


What is Log4J?

This tutorial is going to explain about Apache Log4J.

  • Apache Log4J is logging framework provided by Apache Software Foundation.
  • Log4j is a Java logging framework used in Java programming and Java applications to debug any error/exception in the logs.
  • Log4j has various built-in types of logging debug levels, see below low to high order.

Log4J Logging Levels:

Logging Levels Description
OFF The highest possible rank and is intended to turn off logging.


FATAL Severe errors that cause premature termination to lead the application to abort.
ERROR Error will allow the application to continue running (unexpected conditions/ runtime errors).


WARN Runtime situation that is undesirable or unexpected, almost error condition.
INFO Info will be immediately visible to console.
DEBUG Detailed information on the flow through the system, all are written to logs, this level is very useful to debug the program/application.


TRACE More detailed information and those are written to logs, more than debug level.
ALL All logging levels, including custom levels.


 Step 1

In Eclipse create a Java Project (File > New > Java Project)

Step 2

1 . Create a class file > java

/**

*/

package com.rrmaha.test;

import org.apache.log4j.Logger;

/**

* @author rrmaha.com

*/

public class LogTest {

static final Logger logger = Logger.getRootLogger();

public static void main(String[] args) {

logger.debug(“Test debug message”);

logger.info(“Test info message”);

logger.warn(“Test warn message”);

logger.error(“Test error message”);

logger.fatal(“Test fatal message”);

}

}

2. Create a file properties file > properties

# Define the root logger with appender file

log = /usr/home/log4j

log4j.rootLogger = debug, FILE


# Define the file appender

log4j.appender.FILE=org.apache.log4j.FileAppender

log4j.appender.FILE.File=${log}/log.out


# number of log files to keep before deleting the oldest one

log4j.appender.MaxBackupIndex=25

log4j.appender.MaxFileSize=1KB

log4j.appender=org.apache.log4j.RollingFileAppender

log4j.appender.file=jpe.log


# Define the layout for file appender

# Log message layout: date-time [thread] priority category – message lineTerminator

log4j.appender.FILE.layout=org.apache.log4j.PatternLayout

log4j.appender.FILE.layout.conversionPattern=%d{dd MMM yyyy HH:mm:ss} [%t] %-5p %c – %m%n


3. Create a folder

/usr/home/log4j

4. Create output file name(log file name)

log.out

5. Add log4j jar file > log4j-1.2.16.jar

Step 3

Step 4

Open a file > \usr\home\log4j\ log.out

04 May 2017 19:59:27 [main] DEBUG root – Test debug message

04 May 2017 19:59:27 [main] INFO  root – Test info message

04 May 2017 19:59:27 [main] WARN  root – Test warn message

04 May 2017 19:59:27 [main] ERROR root – Test error message

04 May 2017 19:59:27 [main] FATAL root – Test fatal message